OK gang. I
promised to do a “tutorial” on how I sharpen my wildlife photos, so here it
is. Let me start out by saying that
while I tend to use a couple of actions I wrote, I treat each image
individually. I just don’t feel
comfortable doing it any other way. Every
image needs different amounts of sharpening and/or other processing.
So what I’ll really be showing here are some of the
various techniques I use to achieve a look that I like. For the purpose of this tutorial, I will be sticking to
Photoshop’s Unsharp Mask as my main sharpening tool.
I have used High Pass sharpening from time to time, and there are other
tools out there that work equally well, and better in some cases.
The key, as you will see below is to do all of your sharpening on
separate layers. I’ll get to the
specifics in just a minute.
I’d also like to point out that I’m using Photoshop CS.
All of the techniques here will work on PS version back at least through
6, and probably even version 5. However,
since I’ve never used PS Elements, I cannot vouch for what will or won’t
work with that platform. Perhaps
others can add to this.
There is a school of thought that recommends doing a pass at sharpening as the very first step after conversion from RAW. (If you are shooting JPEGs, that is already being done in-camera, so I suggest you ignore this step). I happen to agree with this recommendation. The reasoning behind it is to compensate for the effects of the AA filter placed over the camera's sensor that is used to mitigate moiré effects. As such, I do think it’s a good idea. This is generally referred to as "pre-sharpening".
In addition to this pre-sharpening, sharpening is also one
of the very last things I will do after I finish processing an image -
especially if there was any resizing that occurred during the processing.
Resizing will always soften an image because it invariably involves averaging
pixel values. The only things after I do before this final "output
sharpening" are to convert from ARGB (my working color space) to either
sRGB or a printer's profile, and then to reduce the image from 16-bits to 8-bits
as the very final step before saving the file for the web or printing.
Another thing to note is that I will save a PSD version of the file just before
the resizing step. This allows me to take my final,
processed image, and re-purpose it for the web, or printing or whatever, without
having to repeat all of the processing steps. It also lets me go back and
make any changes necessary with as little work as possible. These PSD
files can get quite large, so I will archive them to DVD.
There are a couple of steps that I will perform on an image
just prior to the “pre-sharpening” as I refer to it.
This is in contrast to the “accepted” practice, but they are pretty
minor steps.
Obviously, the first thing that I do is to convert the
image from RAW to 16-bit TIFF. I
make any necessary white balance and exposure compensations in my RAW converter
as best I can. This might even
include adjusting curves slightly, as well as minor saturation tweaks.
Sometimes, however, I prefer to do this in Photoshop.
After converting from RAW, my very first step in Photoshop
is to do any cropping and major cloning. I
want to do the cloning before the initial sharpening to avoid cloning any
possible artifacts, but I doubt that the order here makes a whole lot of
difference. The purpose here is not
to talk about how to clone or crop, so we’ll assume that you now have an image
that has this sort of work done.
Since I so often shoot at higher ISOs, the
sharpening technique that I rely on most is one called Edge Sharpening.
The idea behind this is that if you can identify the edges in a photo,
and just sharpen those, you can avoid sharpening noise and making it much more
visible, especially in Out Of Focus areas (OOF).
The way this is accomplished is by doing your Unsharp Mask on a copy of
the background layer (it should be immediately above the untouched background
layer). We then will create an “Edge Mask” so that only the edges
will be visible from the sharpened layer.
Fortunately, Photoshop provides not one, but two (count
‘em, 2!) very good methods for isolating the edges in an image.
The first is the cleverly named “Find Edges” item in the
Filter->Stylize menu.
The second, and one that I prefer in many ways, is oddly
enough to be found in the “Smart Blur” filter found in the Filter->Blur
menu. You can access the edge
finding capability of this filter my selecting “Edge Only” from the Mode
drop-down menu in the dialog for this filter.
The reason I like this method of finding edges is that the Radius,
Threshold and Quality controls give you a lot more control over the edge mask
that you generate. Also, it
requires two less steps (Desaturate and Invert) than the Find Edges filter
requires in order to create our edge mask. Sadly, Smart Blur has not (yet) been
coded to work in 16-bit mode. Since
I’m a believer in staying in 16-bit mode until the last minute, I have been
pretty much kept to using Find Edges for my edge sharpening.
However, if you are working in 8-bit mode anyhow (for whatever reason),
you might want to experiment with this method of producing our edge mask.
So let’s see how this is done in practice.
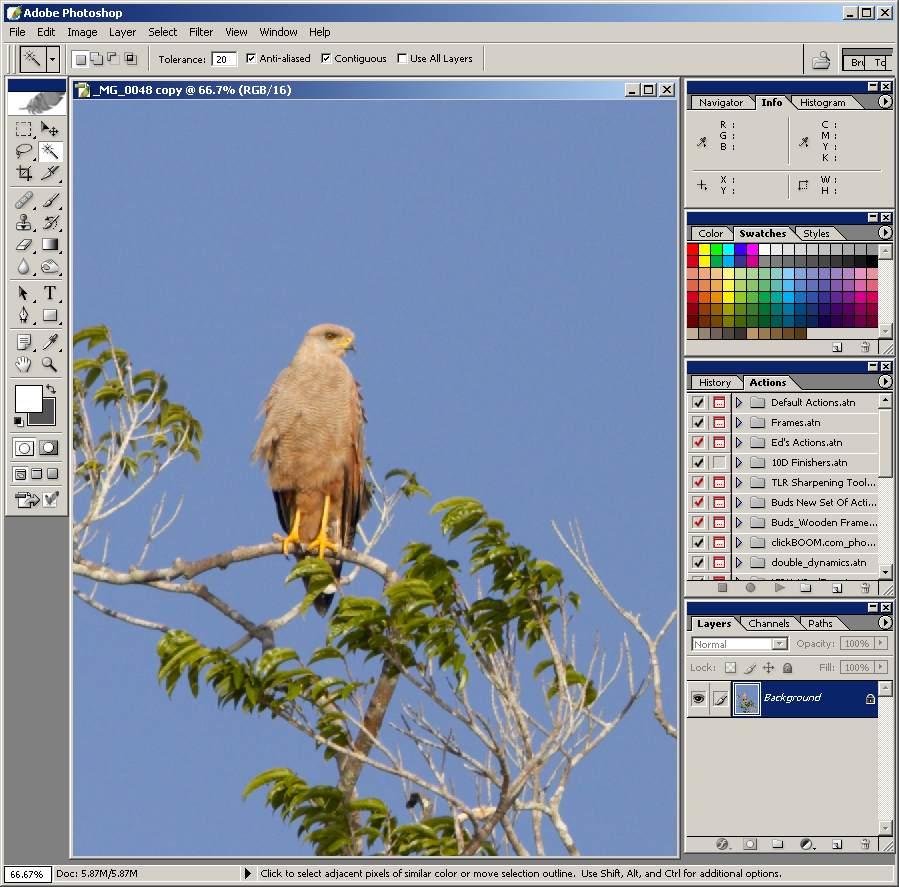
For the purpose of this tutorial, I am going to use a somewhat soft photo
of a Savannah Hawk taken on my recent trip to Guyana.
I’m using this image to show you what you can accomplish.
Using a better photo to start will only yield better results. But be aware that the values that I use for sharpening,
blurring, etc, in some of these steps are image specific. A better image might need less initial sharpening.
So here is our starting image after RAW conversion and cropping. (This image didn’t need any cloning.)
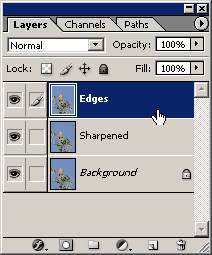
So, the first thing that we will do is to duplicate the background layer twice. We will rename the middle layer "Sharpened", and the top layer "Edges". If you are not sure how to duplicate a layer, just click and hold on the layer to be duplicated in the Layers palette (lower right hand corner of the screen), and drag that layer down to the icon that is next to the Trash Can icon on the bottom of the Layers palette. Once you've created the two new layers, your Layers palette should look like this:
So let's find our Edges!! Make sure that the Edges layer is selected as shown above. Now select Filters->Stylize->Find Edges. Viola! We have edges, and it looks pretty weird. It's not usable as an edge mask this way for a number of reasons, so let's continue working with it a bit. Since masks are all gray scale, the first thing we want to do is to Desaturate (Image->Adjustments->Desaturate) this layer. Then, since we want the edges to be white in our mask so that it will allow the sharpened layer to be visible there, we will need to Invert (Image->Adjustments->Invert) the layer (these two steps are not needed if you got your edges via the Smart Blur filter). You should now have something that looks like the following:
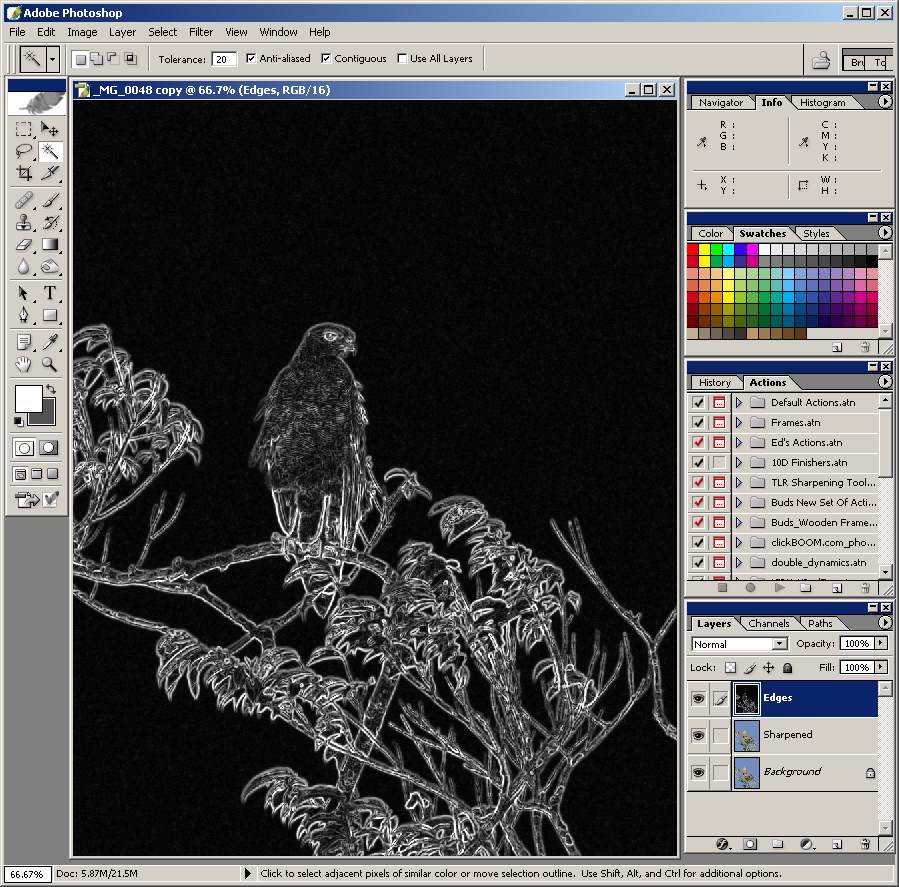
This is certainly usable as an edge mask, but if we have even a somewhat noisey image, and you are picky like I am, you will notice that even in the OOF areas or sky areas, that there is some gray in this mask where the noise is. Note that using Smart Blur and adjusting the Threshold properly, this is not an issue. However, we are using Find Edges here, and we want to get the most useful mask we can, so there are still some things we can do. The first thing would be to adjust the contrast of this mask to drag the dark gray values down to true black. We might also want to adjust the brightness to pump up the true edges. Remember however, that this is a balancing act. If you go overboard with these adjustments you will wind up with very sharp edges sticking out over smooth areas. That doesn't look very good, and there are no hard fast rules here. The thing to remember is that this is going to be a mask, and as such we can modify it all we want later on. So let's just get a good approximate adjustment here. I would run Image->Adjustments->Brightness/Contrast now, and adjust the contrast and brightness such that the OOF areas go pretty much black, and that the light areas get brighter without obliterating the in-between gray levels too much. Experience will help here, and you can even put this step off until after we have converted this layer into a mask.
Let's leave this layer alone for a bit and do the actual sharpening. First click the eyeball in the Edges layer to make it invisible for now. Then Select the Sharpened layer by clicking on it. Now select Filter->Sharpen->UnsharpMask... How much to sharpen - that's always the question. As I said before, for me at least, it varies from image to image. The good news with this technique is that since we are just sharpening a layer, you will have some control after the fact. You can adjust the opacity of this layer to reduce the sharpening at any time. However, you can't make it sharper after the fact. Because of this, I tend to be pretty aggressive with my sharpening values here. For an image from my Canon 20D, I use values of from 300% to 500% with a radius of 0.3 to 0.4, and threshold of 0 or 1. Your mileage may vary, and I urge to you follow your heart here. Just remember that what you see in the preview window can always be reduced via layer opacity, and the effect will also be somewhat further reduced due to the eventual mask we will add for this layer. If you are going to err here, err on the side of over sharpening!
Another thing I should mention is that I generally convert my image to LAB mode and sharpen just the L channel. Using Edge sharpening probably mitigates the need for doing this, and I recommend that you don't bother with that until you are more familiar with this technique. Note that if you do try it, when you convert to LAB mode and back to RGB mode, you will be asked if you want to flatten the image first. Be sure you select No!! Also, be sure that you convert back to RGB after doing the sharpening.
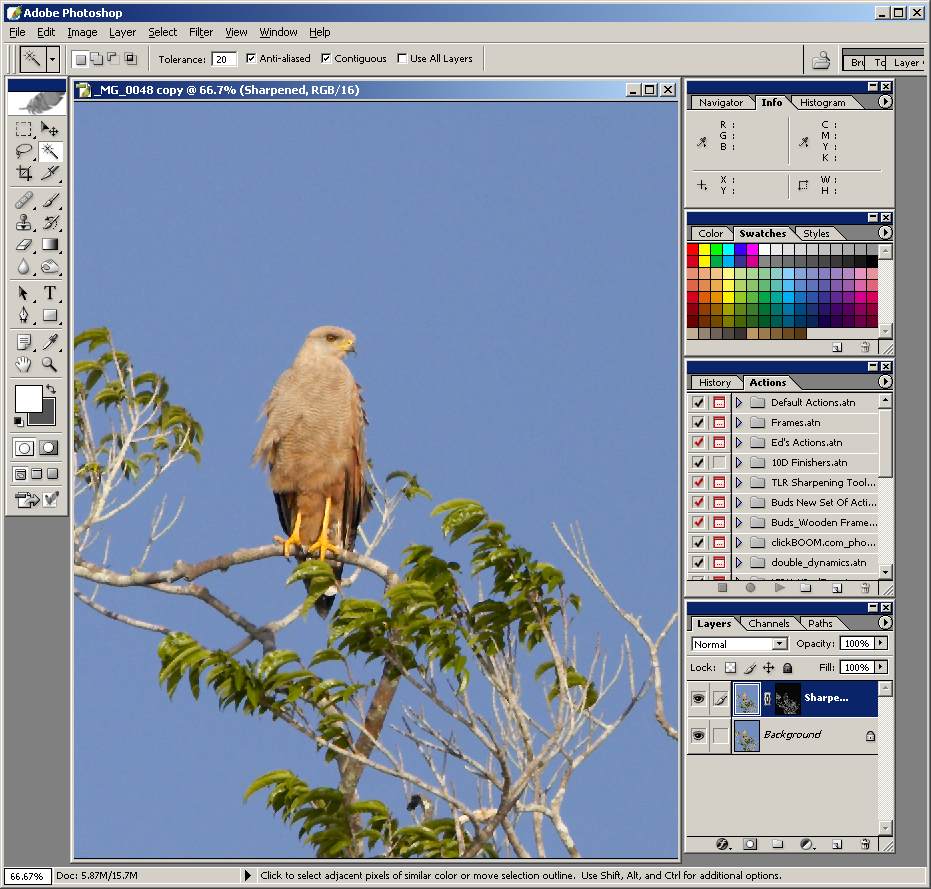
So now we have the original, untouched layer (Background), followed by the Sharpened layer, followed by the Edges layer (which is currently hidden). The problem is now how do we get this Edges layer into a mask for the Sharpened Layer? Well, as you probably are aware, there are usually many ways to do the same thing in Photoshop. This is the method that I settled on. If you've got a better way (which I'm sure there is), let me know, I'd love to learn it. Let's unhide Edges and then Edit->Select All. Then do Edit->Copy. We've now got the gray scale image in the clipboard. Select the Sharpened layer by clicking on it. Then select the Channel tab in the Layers palette and click the "Create New Channel" icon at the bottom of the palette (next to the trash can icon). You should now have a new channel named Alpha 1. Now Edit->Paste Into. We're almost done, but not quite. Now go to the Select menu and choose Select->Load Selection. In the drop-down menu chose Alpha 1. You should now have a bunch of nice marching ants all over your lovely edges. There still one more thing to do. Click the Layers tab on the Layers palette again, and making sure that the Sharpened Layer is selected, click the "add layer mask" icon on the bottom of the Layers palette (that's the rectangle with the white circle in it). Cool! We now have our edge mask in place. So let's do a bit of clean up to keep our file as small as possible. We don't need the Edges layer any more, so click and drag that to the trash can icon at the bottom of the Layers palette. We can also now delete the Alpha 1 channel as well, so click the Channel tab in the layers palette and drag the "Alpha 1" channel to the trash can (don't delete the "Sharpened Mask" channel!). Now click the Layers tab again and we have our edge masked sharpening - no more sharpened noise!!! You can instantly see the effect of the "Sharpened" layer by clicking the eyeball for that layer on and off. Your screen should look something like this:
Remember, we can still adjust the opacity of the Sharpened layer to reduce the sharpening effect. We can also make modifications to the edge mask. By using a separate layer for sharpening, there are even more things we can do. For example, if you feel like you may have over-done the brightness/contrast step with the edges, and you've got funny looking edges in your bird's feathers, try the following: Click the edge mask thumbnail to make sure you are edit the mask and not the sharpened image, and go ahead and paint on the edge mask. You can use a paint brush, or you can use the eraser. I tend to use the eraser and hit the X button the swap whether I'm painting with white or black. I will paint with white to bring up some sharpening in the feathers between the edges to make it look less unnatural. I also tend to reduce the opacity of my eraser to give me more control. Remember that you are only working with a mask. If you mess it up really bad, you could always re-duplicate the Background layer and recreate it all over again.
Another tip is that by Alt-Clicking the edge mask thumbnail in the Layer's palette, you will see the mask instead of the image. This can be helpful in fine editing. Remember that all you are doing with the mask is to modify what is visible from the Sharpened layer. You can blur the edge mask, sharpen it, further adjust contrast and brightness. For example, say you like the overall look of the image, but there are still a couple of places where you have visible halos on edges. Take a very small eraser, and working on the edge mask again, and making sure that the background color is black, erase the edge (with reduced opacity) where the halo is. The halo will start to disappear. By repeated passes or varying the opacity of the brush you can control very finely how much halo you want to allow.
And here is a great trick I came up with that works great for birds against a blue sky. Let's say you've sharpened and created your edge mask. You've got some annoying halos around the bird in places, but reducing the opacity of the Sharpened layer leaves the image too soft. Use the magic wand with a tolerance of about 20. Click on a portion of the blue sky. Now Select->Similar. You should have a selection of just the blue sky at this point. Make sure you have the edge mask and not the Sharpened image selected, and then (making sure the background color is black) hit delete. Your halos will be gone, leaving the rest of the image crisp.
Here is another cool trick you can use whenever you sharpen a layer instead of the image, whether you use an edge mask or not. Sharpening with Unsharp Mask increases the contrast between the darker and light pixels along an edge. This is why we can see halos (light or dark) when we over-sharpen an image. Duplicate the sharpened layer (including edge mask). Now set the mode of the first Sharpened layer to darken. Set the other layer's mode to lighten. You can now adjust the opacity of the pixels that got darkened by the sharpening independently of the opacity for the pixels that got lightened by the sharpening.
Sometimes, not sharpening OOF areas is not enough, and you still have objectionable noise in those areas. You can duplicate Background layer again keeping this new layer between the Background layer and the Sharpened layer. Run your noise reduction plugin on this layer. If you dont' have a plugin, take the original file and make a noise reduced copy of it. Then open that copy and using the pointer tool, drag it onto your working image to create a new layer. Drag this layer to be between the Background layer and the Sharpened layer. Now right-click the edge mask thumbnail in the sharpened layer and select "Set Selection to Layer Mask" from the pop-up. Now, Select->Inverse. Select your noise-reduced layer, and click the Create Layer Mask icon at the bottom. You now have a layer mask that is the inverse of the one on the Sharpened Layer. Once again, you can edit this mask further as desired.
If you are going to use Curves, Levels, Hue/Saturation, whatever, I strongly urge you to do this by creating Adjustment Layers as opposed to just operating with these directly on the image. First of all, once you have a Sharpened layer, it becomes difficult to operate on both that layer and the Background layer. Yes, you could always merge the Sharpened layer with the Background layer, and that is a very viable option. But the Adjustment Layer operates on the sum of the layers beneath it. Secondly, using adjustment layers you can always go back and modify those adjustments after the fact. You can even delete them. Thirdly, you can create masks for these adjustment layers to limit their effect to specific portions of your image. Finally, if you save your files as PSDs, you can even go back after you have saved the files and make further adjustments to the layers. There is not much reason not to use them in my book.
Well, that's about it. There is a lot more you can do with this stuff, and I'm still learning it all as well. This tutorial was not meant to be any sort of bible, but just a starting point for your own experimentation. Aside from using layers, I don't view any of this as hard, fast rules. It's just the way I'm doing stuff today. If you check with me in a year, I'm certain I'll be doing some of it differently.